Purpose:The purpose of this document is to illustrate how to use Microsoft Dynamics AX 2012 Excel Add-in for import of ledger transactions.
Challenge: Data model changes in Microsoft Dynamics related to high normalization and introduction of surrogate keys made some imports more complex. In fact the data model forming General Journal was not dramatically changed and import principle remains the same – populate the journal and then post the journal. However some information which is usually automatically generated in Microsoft Dynamics AX 2012 Rich Client by means of number sequences such as voucher number will have to be provided.
Solution: Microsoft Dynamics AX 2012 ships with General Journal AIF Web Service (LedgerGeneralJournalService) which can be used in integration scenarios. Also General Journal AIF Web Service can be used in Excel for import of ledger transactions.
In order to import ledger transactions using Excel the mentioned AIF Web Service will be used.
Assumption: The assumption is that appropriate reference data such as main accounts, etc. was created in advance.
Data Model:
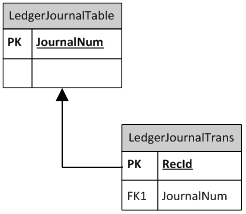
Data Model Diagram:
Walkthrough:
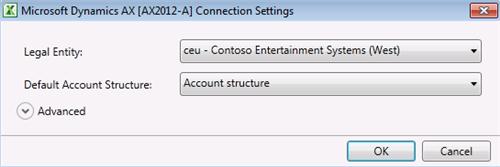
Connection
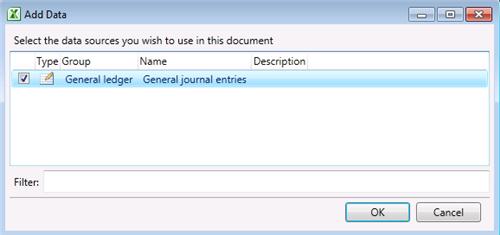
Add Data
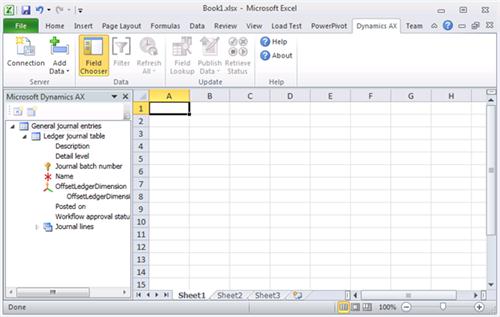
Field Chooser
Accounting structure

LedgerJournalTable

LedgerJournalTrans

Sequence:
1. Publish All
Result:
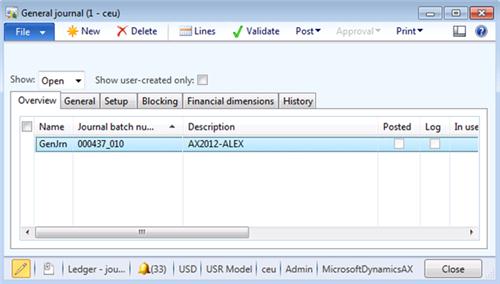
Dynamics AX – General Journal
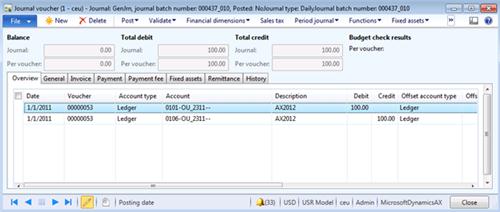
Dynamics AX – General Journal lines
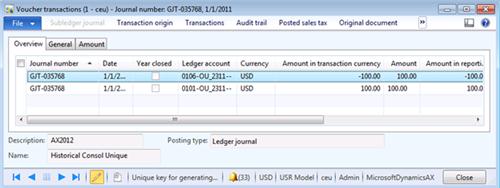
Dynamics AX - Posting
SQL Trace:
Summary: For the purposes of small or medium data migration (data conversion) where performance is not a concern Excel can be used for import of ledger transactions into Microsoft Dynamics AX 2012. General Journal AIF Web Service (LedgerGeneralJournalService) can be used in Excel for import of ledger transactions. Excel template can be created and used for import of ledger transactions.
Imparted from Here
Challenge: Data model changes in Microsoft Dynamics related to high normalization and introduction of surrogate keys made some imports more complex. In fact the data model forming General Journal was not dramatically changed and import principle remains the same – populate the journal and then post the journal. However some information which is usually automatically generated in Microsoft Dynamics AX 2012 Rich Client by means of number sequences such as voucher number will have to be provided.
Solution: Microsoft Dynamics AX 2012 ships with General Journal AIF Web Service (LedgerGeneralJournalService) which can be used in integration scenarios. Also General Journal AIF Web Service can be used in Excel for import of ledger transactions.
In order to import ledger transactions using Excel the mentioned AIF Web Service will be used.
Assumption: The assumption is that appropriate reference data such as main accounts, etc. was created in advance.
Data Model:
| Table Name | Table Description |
| LedgerJournalTable | The LedgerJournalTable table contains all the defaulting and state information pertaining to a single journal. The transaction details of a journal are managed in the LedgerJournalTrans table. |
| LedgerJournalTrans | The LedgerJournalTrans table contains the transaction detail information that pertains to a single journal. The individual transaction lines are also referred to as voucher lines. The journal is a record in the LedgerJournalTable table. |
Data Model Diagram:
Walkthrough:
Connection
Add Data
Field Chooser
Accounting structure
LedgerJournalTable
| Field Name | Field Description |
| Journal batch number | |
| Name | |
| Description |

LedgerJournalTrans
| Field Name | Field Description |
| Journal batch number | |
| Voucher | |
| Date | |
| Company accounts | |
| Account type | |
| LedgerDimension | |
| LedgerDimension.MainAccount | |
| LedgerDimension.Department | |
| Description | |
| Debit | |
| Credit | |
| Currency |
Sequence:
1. Publish All
Result:
Dynamics AX – General Journal
Dynamics AX – General Journal lines
Dynamics AX - Posting
SQL Trace:
Summary: For the purposes of small or medium data migration (data conversion) where performance is not a concern Excel can be used for import of ledger transactions into Microsoft Dynamics AX 2012. General Journal AIF Web Service (LedgerGeneralJournalService) can be used in Excel for import of ledger transactions. Excel template can be created and used for import of ledger transactions.
Imparted from Here


